How (and why) I created my own CDN

Before we begin I am just going to say it: You probably don’t need to do this. There are many great CDN options out there that are great. But, I had specific requirements that made it a necessity that I build my own. I would highly recommend MaxCDN for your own use; I have had great interactions with their team.
Then why did you?
My site loads two different pages depending on whether or not there are cookies set that mark the CSS and fonts have been loaded already. If they are, the server assumes they are in the cache and can be loaded with a normaltag, pulling from the browser cache. If not, then the CSS is set inline, and the Font Face Observer is used to asynchronously ensure the fonts are loaded before showing them (preventing FOIT). This pulls from techniques I talked about in my first blog post on this site’s performance, and more recently the Filament Group's work on prevent FOIT on their site.
What these techniques come down to however, is that I needed a CDN that would allow different content to be cached depending on the value of two cookies. I searched far and wide for a CDN that would allow this, and although many would— it required I have an enterprise plan to use them. Certainly, this humble website does not have the $5,000 / month budget required for such an endeavour. Thus: I had to figure out my own way of creating a CDN.
The servers
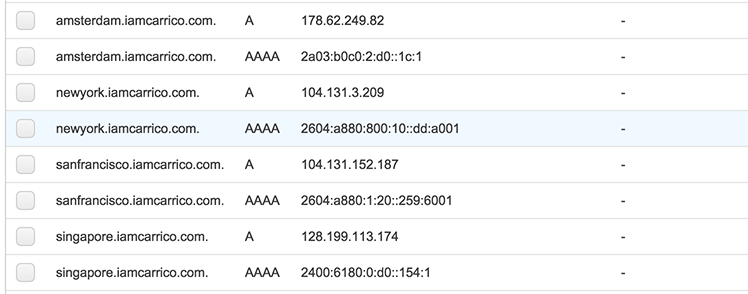
I have four servers, spread out across the globe in New York, Amsterdam, San Francisco and Singapore. Each are one of Digital Ocean’s smallest servers, with full IPv6 support. I selected Digital Ocean primarily because of the cost and the locations of the datacenters. They are much cheaper than AWS or Rackspace and just as powerful as I need them to be. There are also spread out well to where my traffic comes from. I only wish that there was a datacenter in South America as well, as I have found a good amount of traffic comes from there.
The servers are managed with Ansible. The source code for my playbooks are up on GitHub, and although there are some changes I would like to make, it does the job very well. Configuration is all stored inside the repository, and the few variables I have between servers (e.g. hostname) are filled into template automatically.
I can deploy any changes I need just by running 'ansible-playbook -i hosts playbook.yml --limit production', which will go to every production server and update them accordingly. Alternatively, I can setup a new server by adding it to the 'hosts' file, then running 'ansible-playbook -i hosts playbook.yml --limit the.new.hostname'. Just last week, I setup a new server with about 20 min of work, and that is only because I have some user and permissions work that I would like to add to the playbooks. The results are that I have four servers, all in different parts of the world, all setup exactly the same, and all with the exact same files on them.
DNS

Having four servers is only part of the problem though, how do I get users to get to the server closest to them? I looked at several DNS providers from Dyn to Zerigo, but only one provided the features I needed for a reasonable cost. Amazon’s Route 53 costs me $6 / year to have each DNS lookup direct users to whatever the closest server is based on latency.
This works well mostly because Amazon’s data centers are relatively close to Digital Ocean’s. Meaning that the data Amazon keeps on latency from its data centers to locations across the globe is very similar to the latency from the Digital Ocean servers I have set up. The results are that for most places across the globe that I receive traffic from, the round trip time is below 50ms. The slowest is 220ms for Melbourne, Australia. Route 53 has the added benefit that I can also use it to host IPv6 data, as all of my servers can be accessed by both IPv4 and IPv6.
Deployment
The final piece to the puzzle is how to deploy to each server without requiring a bunch of extra or repeated work. Already, I have a gulp task that compiles my Jekyll site and run some optimizations just by running 'gulp deploy'. This also commits to the live branch of my repository with the files ready for the server. The missing piece was how to push those changes to four servers at the same time, without causing any downtime. I first thought about using Ansible, but did not want to be stuck unable to deploy to servers if I had issues with my local machine in whatever way.

The solution, was dploy.io. A simple deployment tool, free for my single repository and user, that could deploy to each of my servers at one. All it took was to create a dploy user on each server, and assign it the proper sudo permissions to only restart Varnish.
# Allow members of deployment to execute deployment commands.
%deployment ALL=NOPASSWD:/etc/init.d/varnish restart
Results
I have four servers across the globe. Each server has the same configuration and the same files. I can relatively easily spin up new servers, and add them to Route 53’s latency-based routing tables. Round Trip Times are decreased for most users, and most users get a faster experience than if I only had one. Most importantly, I can do all of this while still having the cookie-based cache system to load sites as fast as possible.
